Saturday, 16 April 2016

Migration from Windows vCenter 5.5 to vCenter Server Appliance 6.2 - Part 2 - Upgrade vCSA 5.5 to vCSA 6.0 U2

Interrestingly, the process of vCSA upgrade is similar to vCenter Server to vCSA migration. 
First new appliance is deployed and then data is copied over from the old appliance. That is actually a significantly safer of option of upgrade as at any point of the upgrade process you can roll back by simply powering back on your existing vCenter.

Before you start the upgrade procedure you need to complete the following:

1. Install Integration Plug-In from the vCSA ISO file

2. Create temp Ephermal PortGroup. 
This will be used as a temp network by new vCSA 6 to connect to the current vCSA to copy data across. Once the copy is over the new vCSA will take network settings of the old vCSA and this network connection will be dropped. Make sure new vCSA can talk to existing vCSA from this temp network.

Once you complete these prerequisites download and mount vCSA ISO file and run open vcsa-setup.html


1. Press Upgrade button


2. Confirm your current vCenter version allows to upgrade to vCenter 6.0


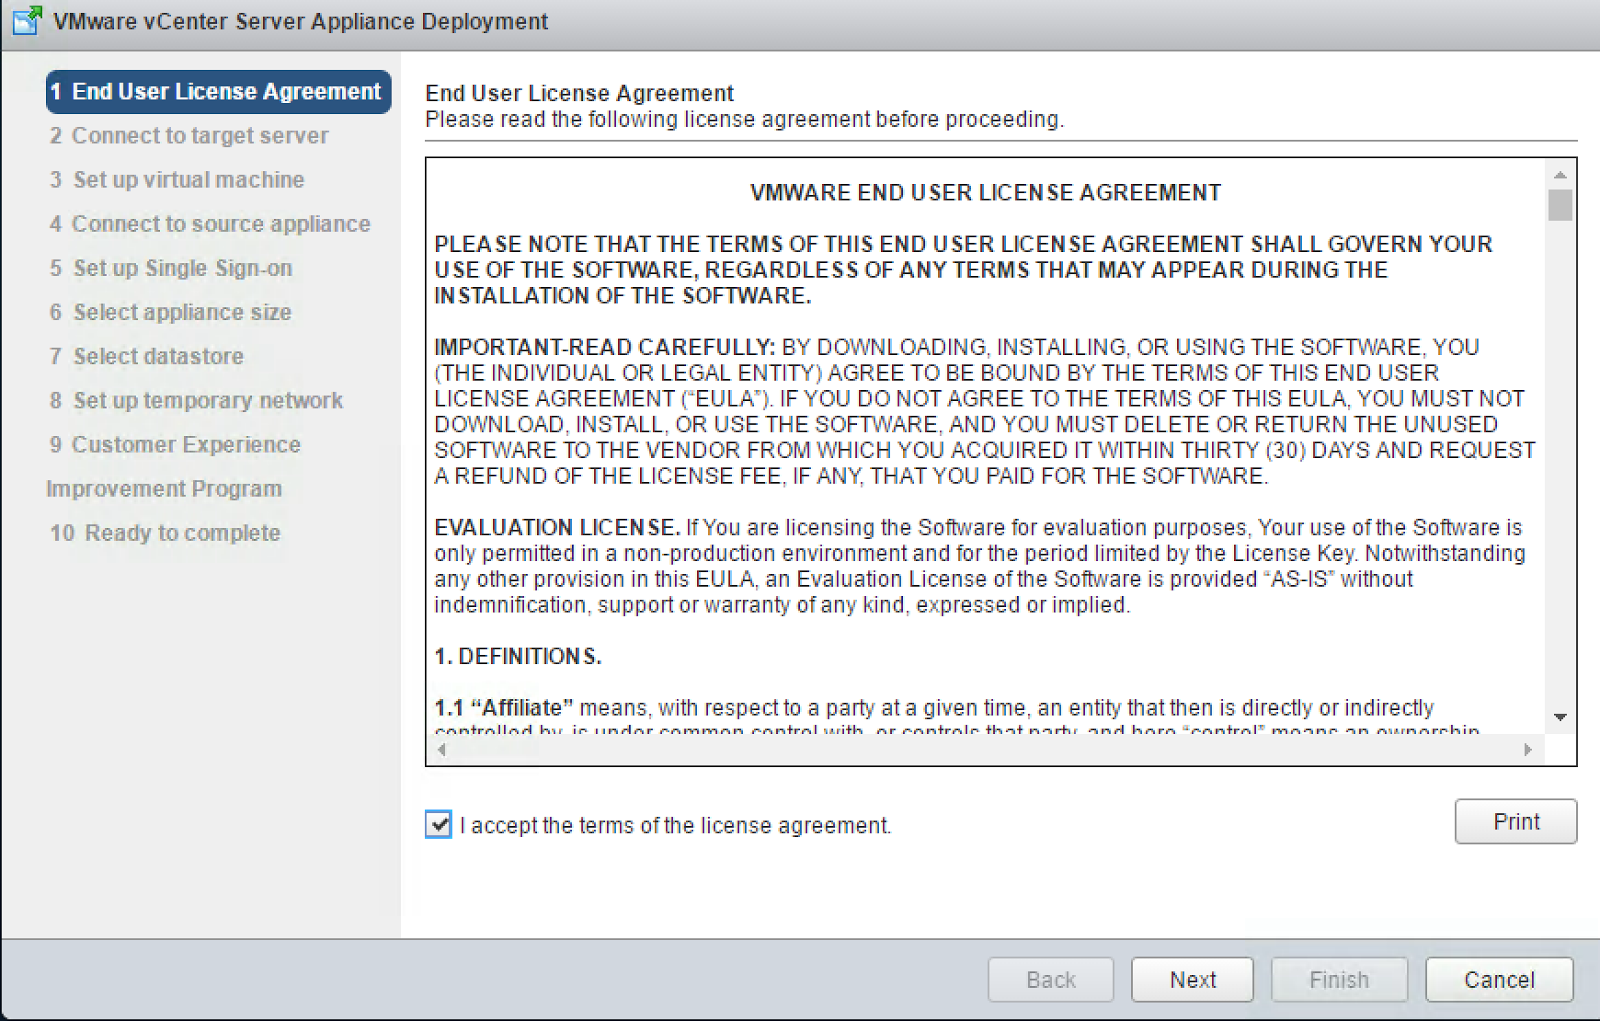
3. Accept EULA


4. Provide FQDN and credentials for the ESXi server you want to deploy new vCSA to


5. Specify name for new vCSA - that's only the VM's name.
Optionally you can enable ssh on the appliance.


6. Enter details of vCSA 5.5 and the host where it resides


7. And I bumped into the first problem


8. Luckily I quicky found the solution in VMware Communities. 

The problem was in extra sequence in Postgres schema which had to be removed.
Run the following command in the vCSA shell and restart the upgrade procedure.

/opt/vmware/vpostgres/current/bin/psql -U postgres -d VCDB -c "drop sequence if exists vpx_host_cnx_seq cascade"


9. Select Appliance Size


10. Select datastore where you want to place new vCSA 6 U2


11. Configure temp network setting. 

I created a Temp portgroup on the same vlan where vCSA 5.5 resides and took advantage of my dhcp server


12. Confirm upgrade wizard settings


13. And the upgrade process failed with message 'Internal error occurs during export'.

I read vSphere Release notes and found similar error that suggested to use static IP address instead of DHCP config for temp network in step 11. Once I re-ran the upgarde wizard again with adjusted settings it all worked just fine

14. Then I spotted there was something wrong with vFRC config.

ESXi was reporting no disk space for vFRC.


But when I tried to remove the SSD and add it again the task failed with error that there are VMs using vFRC.

I checked VMs' settings, but it looked like these were not configured for vFRC even though they were.


So I had to shutdown VMs and re-add SSD disk as VFRC capacity which fixed the issue.

Migration from Windows vCenter 5.5 to vCenter Server Appliance 6.2 - Part 1 - Convert vCenter Server 5.5 to vCSA 5.5

I have been postponing too long to upgrade my home lab on vSphere 5.5 to vSphere 6.
I have used all kinds of reasons to postpone it - getting ready for VCAP5-DCA exam, testing StarWind, playing with vRA and vROps, but I am out of excuses now.

I have also thought it would be good to move from vCenter server to vCenter Appliance. It is quite obvious that VMware strongly pushes customers to vCSA and it is currently on par with vCenter server feature-wise. The only feature vCSA is missing now when comparing with vCenter Server is high availability, which can be partially provided with FT, but it has its own limitations. Definitely, vCenter Server on Windows Server Cluster looks a bit more reliable solution right now. Although, VMware has already let us sneak peak on HA features of future build of vCSA. Can't find this VMworld Session right now, but you can google it. 

Another thing I wanted to play with in vSphere 6 is Enhanced Linked Mode with 2 vCSAs. To be able to use ELM I need External Platform Services. My current vCenter DB is hosted on external SQL server.

Unfortunately, there is no supported or direct upgrade path from vCenter Server to vCenter Appliance yet, but it is still doable. What I am planning to do is not a proper solution for production environment, but works just fine to home lab/Dev/Stage environments.

Here is  high level overview of the entire process. If you are prefer a step-by-step procedure just follow the links below.


1. Convert vCenter Server 5.5 to vCSA 5.5 

I will be doing this using awesome and popular VMware Fling - VCS to VCVA Converter.
*It is not supported solution, but the fling has very positive feedback. I hope VMware will integrate it in the next vSphere build.

2. Upgrade vCSA 5.5 to vCSA 6.2

3. Upgrade ESXi hosts to the latest build with ESXCLI

4. Reconfigure vCSA with embedded PSC to vCSA with external PSC


In this post we will be migrating vCenter Server to vCenter Server Appliance. 

Here are the things I did prior running the conversion:

  • Uninstalled and unregistered the following products to ensure clean and simple migration: 
    • vSphere Replication 
    • Infrastructure Navigator 
    • vRealize Operations 
  • Disabled vSphere Update Manager service 
  • Downloaded the same build of vCSA appliance as my current vCenter
  • Downloaded Fling appliance and checked all pre-requisites are met

You will need the following information during the conversion:
  • SSO Administrator Password
  • vCenter server local administrator password
  • DB Server name and port
  • vCenter DB name
  • vCenter DB Username and password

If you run vCenter on Windows 2012 Server you will need to adjust WinRM security settings by executing the following commands as Administrator:

winrm quickconfig
winrm set winrm/config/service/auth @{Basic="true"}
winery set winrm/config/service @{AllowUnencrypted="true"} 


1. Deploy Converter Appliance

2. During the OVF Import task click Yes to the warning  saying this OS identifier is not supported and that it will be marked as 'Other Linux 64-bit'


3. Power on the converter
4. Deploy vCSA 

Use the same IP and hostname as of the current vCenter when importing OVF, but DO NOT POWER ON vCSA yet. 
Take a snapshot of it in case problems arise during the migration and you need to reset the appliance to a clean state.


5. Proceed with migration Wizard

Enter vCenter Server's IP address and Local Windows Administrator password. I tried domain admin account, but it didn't work


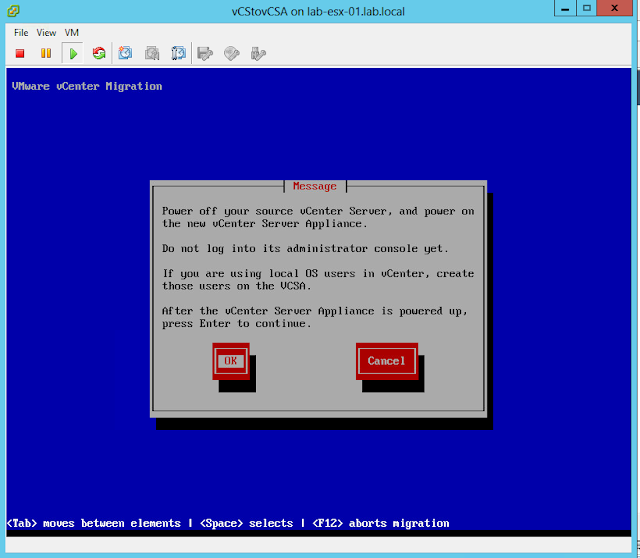
6.  Once the copy process from vCenter to Converter is over you will be asked to shut down current vCenter and power on new vCSA. 

Don't login to vCSA yet.


7. Open vCSA console and wait until you see the following screen.


For some reasons static IP configured in OVF deployment wizard of vCSA didn't apply. Instead it was taking DHCP address. So I had to create DHCP reservation with IP Address of vCenter Server.

Update: After I completed all steps of migration I found another workaround in Fling comments '' Boot of the vcsa : we encountered the problem of off parameters injection. OVF injection needs the vcenter for first boot, but as the address is the same as vcenter, only one shold be booted up at a time. We have here a problem of chicken and egg that we solved with first booting the VCSA with network disconnected, then shutdown the server and finaly, connect the vcsa network through ESXi connection.)

8. Accept SSH key


9. Enter default password for root account in vCSA


At this stage Converter appliance will start copying saved data to vCSA

10. Enter DNS suffix


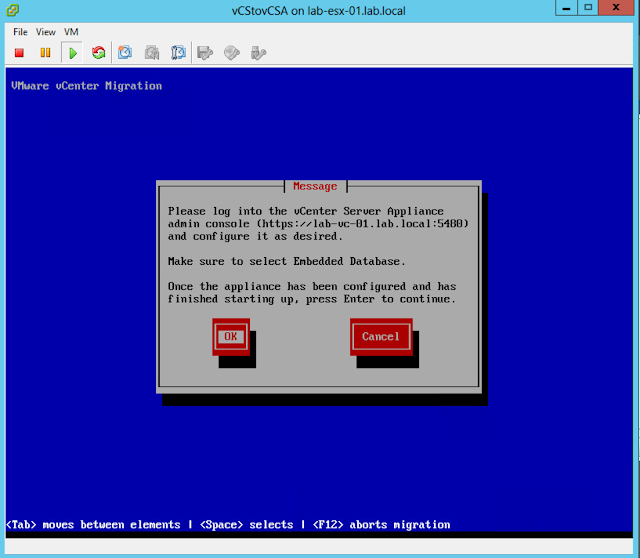
11. Log in to vCSA and complete configuration of the appliance


12. Choose Custom configuration


13. Choose embedded DB type


14. Configure password for the embedded database


15. Enable AD integration


16. Once you are done you can switch back to Converter console and click OK


17. Accept Certificate


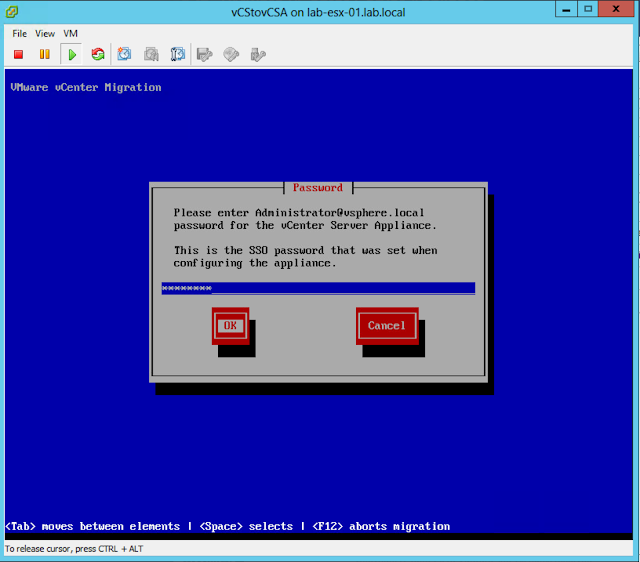
18. Enter SSO Admin password


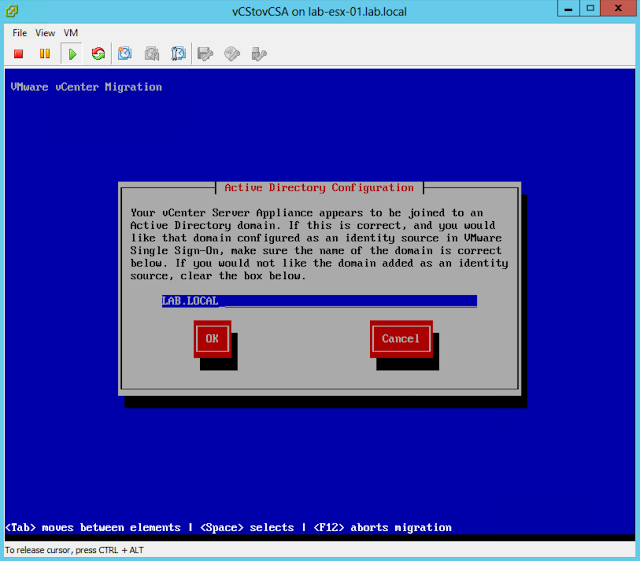
19. Confirm domain name is correct


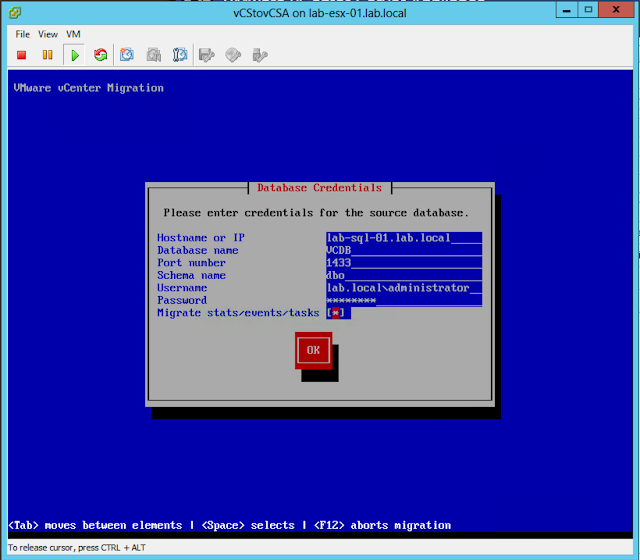
20. Enter vCenter DB details


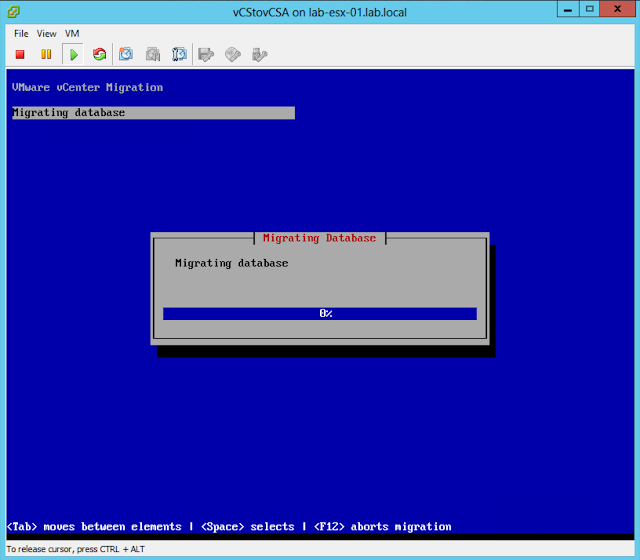
Grab a cup of coffe and enjoy a break - the DB migration can take a while, especially if you chose to migrate stats,events and tasks.


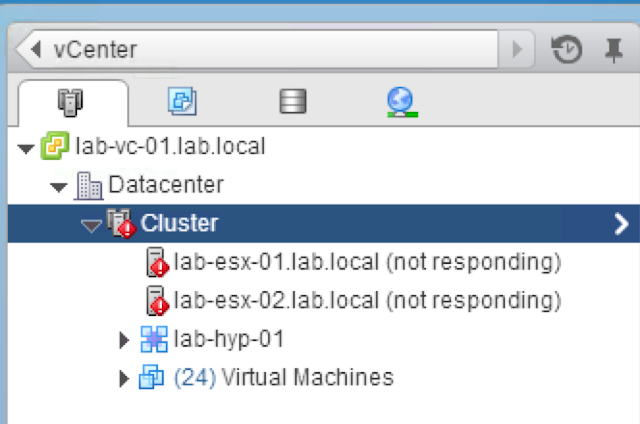
An hour later I got database migration completed and could open Web Client from new vCSA, but faced another issue


I checked the vCSA network settings and noticed that it was still using DHCP and vCSA was still getting the correct IP address of old vCenter Server, but looks like it didn't accept the DNS server address from DHPC. Once I changed the IP Address config to static vCSA managed to reconnect both ESXi hosts

I also had to upgrade virtual hardware of vCSA to version 10 so that I could configure it to use vFlash Read Cache.

That completes the almost smooth migration from Windows vCenter Server to vCenter Server Appliance.

Tuesday, 12 April 2016

Why I prefer to disable vSphere HA Admission Control


According to vSphere Documentation "vCenter Server uses admission control to ensure that sufficient resources are available in a cluster to provide failover protection and to ensure that virtual machine resource reservations are respected."

Admission Control guarantees enough capacity is available for virtual machine failover and it works at 3 different levels - Host, Resource Pool, Cluster.  Only the Cluster level Admission Control is manageable and that's what I want to talk about.

Even though the idea behind Admission Control is pretty simple this mechanism is a complex topic and according to the best book about vSphere HA by Duncan Epping and Frank Denneman "Admission Control is more than likely the most misunderstood concept.. and because of this it is often disabled".

To achieve its goal the admission control can use the following actions:
  • Restrict Powering on a virtual machine. 
  • Disallow Migrating a virtual machine onto a host or into a cluster or resource pool. 
  • Restrict Increasing the CPU or memory reservation of a virtual machine. 
In simple words vCenter uses Admission Control to have enough resources to power on VMs in case one or more of the hosts fail, but not to guarantee VMs have the same set of resources.

To achieve this goal Admission Control can use 3 different mechanisms. Let's discuss what diffuculties vSphere admin may have with each of them.

Host Failures Cluster Tolerates


Slot size will be the main factor defining when vCenter won't let you power on another VM. This admission control type gets skewed very easily by having one large VM with all RAM reserved.

Yes, you can define custom slot size, but deciding on the right size of the custom slot isn't a trivial task. If you set it too low you can't be sure you have enough reserved resources for host failure. If you set it too high you will end up with fewer number of slots you can use for your VMs. So you can end up with cluster with plenty of available resources, but won't be able to deploy new VM. Also, most of the vSphere environments constantly grow and change. therefore, slot size have to adjusted accordingly.

One can calculate average VM size and use these values for custom slot size. However, while vCenter will reserve enough slots to tolerate failure of configured number of hosts it won't guarantee that either of your host will have enough resources to power on your largest VM. 

HA Cluster is smart enough to ask DRS to shuffle VMs around to make space for your large business critical server. But, there is still no guarantee of successful restart of this VM. Moreover, we all know that DRS is part of vCenter. So if vCenter was located on the failed ESXi host there will be no DRS to take care of resource defragmentation in the cluster.

Percentage of Cluster Resources Reserved


This Admission Control seems to be smarter and more flexible than the first one. vCenter doesn't use fixed slot size any more. This is what most vSphere admins recommend to use, but nobody stresses out that in order to have this policy work you need to set CPU/RAM reservation per every single VM in the cluster.

So here is what vCenter does:
  1. Calculate how much resources it has in the cluster 
  2. Calculate total reserved virtual machines resources 
  3. Calculate available resources by distracting the reserved resources from available resources. 
  4. Ensure that there is more available resources than percentage of reserved resources for failover (that's the percentage you configure) 

As you can see it is not based on assigned resources to VM. This equation works with RESERVED resources only.

So if you need to end up with properly working admission control you need to assign reservation on each of the VMs. Otherwise, you may end up with situation like in the following screenshot where we you can see that the cluster runs almost 300 VMs, but Admission Control thinks you have 98% of Cluster Failover Capacity.


This is very common situation where people don't use reservations at all or use Resource Pool reservations (which are not taken into consideration by Admission Control). In this case Admission Control uses default 32MHz and Memory overhead in its calculation and your cluster will run out of resources way before admission control kicks in and prohibits powering on new VMs.

Well, you can say - let's use VM reservations then to make admission control work properly, but I have to disagree for the following reasons:

  • Reserverd RAM can't be re-allocated to other VMs even if it's not used at all. That's valid for Windows VMs as they zeroize all RAM pages during the boot. Linux VMs don't touch RAM pages until they really want to use them, thus, these 'untouched' memory pages can be still re-allocated to other VMs. 
  • It also leads to higher administrative and operational overhead. Imagine micro-managing correct reservations for thousand of VMs and then keeping these reservations up to date. 
  • VMware Performance Best Practices recommend using Resource Pool Reservations instead of VM level reservations

On top of that you have to remember to change percentage every time you change number of hosts.  And if you have unbalanced cluster you need to have different percentage reservation for CPU and RAM.

This approach doesn't solve the problem of resource defragmentation either. DRS still needs to kick in if the host doesn't have enough resources to restart VM. And again, if vCenter is down there is no DRS. Which means there will be no defragmentation and some large critical VMs won't power on.


Dedicated Failover host


This is the least preferred option according to multiple blogs and books on HA Admission Control, but I strongly disagree with such opinion.

First of all it is very simple and doesn't require a lot of planning. it is pretty much 'You get what you see' 

The main reason why people recommend against using the dedicated failover hosts is that these hosts are not utilised until other hosts fail. Although that's actually applicable to other Admission Control mechanisms as you still have to reserve resources for failover - which means you keep those reserved GHz and GB unused. 

This approach doesn't have issues with resource defragmentation and doesn't need DRS. So if vCenter fails with failed host you still get your large VMs restarted.

This Admission Control type comes with some drawbacks:
  • When you have hosts in this hot-standby mode the ratio of vCPU/pCPU gets worse as less physical CPUs participate in servicing vCPUs, which can impact CPU Ready time. 
  • Another problem could be if this server is a part of VSAN cluster. That would be too much waste of resources. 
As you can see none of the Admission Controls is ideal. None of them fit all sizes. And each mechanism requires thorough planning, testing and regular revisions.

On the contrary to what Duncan and Frank said I prefer to disable HA Admission Control because I understand how it works . Instead, I think it is sufficient to have a good monitoring system in place to control vSphere utilisation level and see resource usage trends so that you can do capacity planning in advance. vRealise Operations suite is a good example of such monitoring system. 

I am not trying to say it is useless in all situations, but there were very few companies where I saw Admission Control correctly configured and looked after properly, and all of these few companies used Dedicated Failover host.

And the bigger problem was that people blindly relied on HA Admission Control even though it doesn't work correctly without per VM reservation or without right-sizing the slot size.

Tuesday, 5 April 2016

StarWind Virtual SAN review - Part 7 - Final Thoughts

I spent a quite interesting couple of weeks with StarWind product. Once you know it better you can definitely see how flexible this product is and how many scenarios it perfectly fits in. Given the fact that it has very low system requirements, e.g. you can run it without RAID array and you can use second-hand servers, StarWind Virtual SAN becomes a really tempting choice. 

Even though StarWind aims its product at SMB/ROBO segment of the market it still delivers great performance and high availability for your storage. Moreover, StarWind R&D constantly brings in new features and are pretty open to Virtual SAN community suggestions.

There are some new features and improvements that will be brought in future builds according to the roadmap:
  • Node majority for StarWind HA. Using node majority instead of heartbeat channels to solve potential split-brain issues in storage cluster. Additional data-less voting node for the case of even number of replication partners.
* hopefully, there will be a choice between both options.
  • VTL: integration with system deduplication for tape images.
  • Caching: cache statistics information in UI and cache management functionality for changing cache size and cache mode for existing device.
* that is one of the feature I lacked while running performance tests.
  • Global deduplication: shared deduplication base for multiple LSFS devices.
* I assume it will increase deduplication ratio and at the same time will decrease RAM allocation for hash tables
  • LSFS extend device functionality. Change size of existing LSFS device.
  • LSFS device maximum size is to be increased to 64TB


On top of that I would really like to see the following functionality:
  • be able to change cache size on the fly and some kind of built-in health checks.
  • It would be also great to get some kind of dashboard that will show current alerts - e.g. failed Sync link; potential issues - e.g. low disk space; performance stats - e.g. disk latency, IO size. 
  • Shorter LSFS mounting time
  • Simultaneous resync for multiple devices. Currently only one device can be re-synced at a time after partner node’s reboot. 

And my biggest wish is that StarWind get all their documentation updated to the latest builds. It would be also  great to have a cookbook which deep-dives into technical explanation of all great features the product and describes the most common deployment scenarios. 

StarWind Virtual SAN is a permanent tenant in my home lab now and I will definitely be tracking the progress of this product in future versions.

StarWind Virtual SAN review- Part 6 - Failure Scenarios

In this part of the review I would like to talk about some possible failure scenarios and how StarWind Virtual SAN reacts to them.

1. Heartbeat link failure

It causes no impact on the functionality for the simple reason that heartbeat link is used in case of Sync link failure only. If it is caused by failure on ESXi level or failure of the physical switch make sure you have those properly monitored.

2. Sinlge Sync link failure


ESXi hosts will still see all your targets, but storage performance may decrease because the surviving SYNC interface's bandwidth won't be able to cope with the amount of SYNC traffic.

3. All Sync links failure. 

When SW Servers can't reach each other over Sync links they will use Heartbeat link to identify whether its partner server is online or offline:

a. Online - Secondary device will disable access to all devices. Primary device will flush the cache to the disks (if you have large cache that can cause temporary disk contention) and the cache will be switched into write-through mode to ensure the integrity of the data if primary SW node fails too. All nodes will fail over storage pathes to the primary SW appliance. Once the sync link is restored you SW will resync HA devices.

b. Offline. The server will declare himself a master.

4. Sync and Heartbeat Link Failure

This is the worst case scenario when both nodes believe they are the only survivor. Data get unsynced and can be considered as corrupted, and the data restore is the only option in this situation. Therefore, don't hesitate to have more than 1 heartbeat link. Heartbeat interface doesn't generate much traffic and can co-exist with other traffic types without any significant impact. 

5. Disk Failure

a. RAID0 - SW loses access to the device. All paths will be switched to the other node. 

b. RAID1,5,6 - there will be performance decrease as your raid arrays will have to handle RAID rebuild load while servicing other IOs.
`
6. SSD hosting L2 cache failure

If L2 cache was set to to Write-Through mode the Virual SAN device goes offline on the given server, but its replica stays online on the partner node. To bring it back online you will need to disable L2 cache and to restart StarWind Virtual SAN service. That will make device active and will resume syncing with partner device.

7. SW Server/ESXi host failure


StarWind Virtual SAN review - Part 5 - Performance tests

In this part of StarWind Virtual SAN review I will be testing and comparing performance of different disk types using different combination of features. But let me first start with a short description of my test bed.
  • 2 x ESXi servers with Avoton CPUs - C2750DI4
  • Each ESXI host has: 
    • 1 x 7.2 HDD 
    • 1 x 256GB SSD. 
    • 6 x 1GB NICs. All NICs are connected to a single TP-Link switch.
  • First pair of NICs on each host is used for management and VMs traffic, another pair is dedicated for iSCSI traffic to Synology box and the last two NICs are reserved for StarWind servers. 
  • All VMs, including StarWind Virtual SAN Servers, run on a shared iSCSI storage (Synology). 
  • Each ESXi server hosts one StarWind Virtual SAN and has two local VMFS datastores - created on HDD and SSD disks
  • The test disks, attached to Virtual SAN servers are placed on local HDD (data) and SSD (L2 cache). Thus, there is no other workload present on test disks.
  • Each Virtual SAN server has two additional disks - one per each local datastore. That's where the test disks and corresponding Level 2 cache files are created. 

There is another important thing to mention before you get to the test results. I don't have any intention to provide test results that could be valid for real-life scenarios for the simple reason that my Lab setup doesn't meet the minimum hardware requirements for StarWind, e.g. Intel Xeon E5620 (or higher) CPU. 

My idea was to compare different combination of disks and features and to see how each feature contributes to performance. For instances, I was curious to check how many times Flat disk with L1 and L2 caches is faster than regular disk, or how HA Disks' performance depends on the multipathing policy. 

Here is all all combinations I wanted to test summed up in one table
StarWind Tests Config


The plan was to get the baseline performance running IOmeter natively in StarWind so that I could compare it with the productivity of the Virtual SAN disks running on top of StarWind server and its overhead.

Then I created 11 different StarWind devices as per the table above and presented them to the ESXI hosts. I have also adjusted the number of IOPs to 1 before ESXi hosts switch the path to Virtual SAN servers as per VMware KB2069356. That means each host will be talking to both Virtual SAN appliances (the local and the remote ones) when StarWind device is mirrored to another appliance.

Then I have created a Test VM with 11 disks placed on corresponding Virtual SAN datastores.


That's the final picture of my datastores

And that's how the disks in Test VM look like


I hope you get the idea of the test setup now.

IOmeter was chosen as a test tool, however, it was taking IOmeter too long to create test file so I used RDFC (Random DataFile creator) utility to create test files.

Here is the IOmeter test specification: 

  • 20GB Test File 
  • 4KB Block size
  • 32 outstanding IOPs 
  • 100% Random, 67% Reads, 33% Writes, 
  • Duration 2 minutes.

The table below depicts the final test results using Round Robin multipathing


Now let’s talk about performance results with regard to each disk type.  

Flat

As you can see Flat device result is very close to the baseline result. That means the overhead of StarWind is minimal and can easily be neglected.

Flat-HA

Here you can see benefit of Read Striping when ESXi hosts take advantage of all disk spindles in both ESXi servers (387 vs 287). However, this positive effect applies to Reads only. If you have Write intensive applications, it is better to use Fixed multipathing policy.

Here is a nice article which also proves benefits of mutlipathing on StarWind

Flat-L1

L1 cache proved to be pretty helpful as it lets Virtual SAN servers deal with IO bursts. During the IOmeter test Virtual SAN cached all Writes in RAM while HDD served Reads only. Once the test was stopped I could see Virtual SAN de-staging all Writes onto HDD.

Here is how it looks in the performance graph


Flat-L1-HA

This disk config reflects further performance improvement, again due to Read Striping across both hosts.

While testing this particular disk type I found out how important it is for StarWind product to have the correct IOPS limit for Round Robin policy.

At first run I have default 1000 IOPS limit and what I noticed that both hosts didn’t seem to cache any writes. As soon as IOmeter started I could see that both Virtual SAN servers started to push writes to HDD. It looked like L1 cache wasn't utilised at all. 
This didn’t happen in previous scenario with standalone Flat-L1. However, when I changed IOPS limit to 1 the caching started to work again.

Here is what, I believe, happens with IOPS limit set to default value of 1000.
  • ESXi host sends 1000 IOs over the first path to the first Virtual SAN server.
  • Writes are stored in L1 cache. Reads are serviced from HDD.
  • ESXi host send another 1000 reads and writes over the second path to the second Virtual SAN server
  • While second Virtual SAN processes these IOs the first StarWind server thinks that workload is dropped to zero and starts de-staging data stored in RAM.
  • When ESXi host switches back to the first iSCSI path the second StarWind server starts dumping cache data on the HDD as well.

So you end up with the situation when both Virtual SAN servers have plenty of cache to accommodate gigabytes of Write IOs, but StarWind doesn’t take much advantage of it since it keeps data in the cache for very short period of time and constantly flushes the cache data to HDD, thus, impacting Read performance.

Therefore, with IOPS=1000 I was getting around 310 IOPS in IOmeter, but once IOPS limit was changed to 1 the performance jumped up to 600.


Flat-L1-L2

Even though the results are pretty good we can see that the presence of L2 cache didn't improve results as much as I expected. I had a chat with StarWind engineers and I was told L2 caching algorithm is going to be improved in the next build. Also, it ought to be noted that my test runs were pretty short to get enough data cached in L2 and to get significant advantage of it.

Flat-L1-L2-HA

Another example of benefits of Read Striping with Round Robin multipathing. Also, if you compare this result with Flat-L1-HA you can see that L2 cache hasn’t been useful at all. Again, let’s wait for a newer build and hope SSD commodity disks contribute more into overall performance.

LSFS

LSFS shows serious increase in performance compared to Flat disk -  341 vs 287. This difference is valid only for this particular test configuration. As it was mentioned before LSFS is pretty good in dealing with Random Writes, but it isn't efficient for Sequential Reads, for instance.

LSFS-HA

No surprises here. The result is almost doubled compared to standalone LSFS (341 vs 654) due to double number of Virtual SAN servers and physical disks servicing IOmeter.

LSFS-DD

Deduplication increases performance of the LSFS even further (359 vs 341). This happens because LSFS computes each data block's hash on the fly and will compare it with hash table stored in RAM. If this data already exists on the LSFS disk Virtual SAN will only have to update metadata table without writing actual data which can save some Write IOPs.

Deduplication applies to cache data too, which means more data can be stored in cache, thus, increasing cache hits ratio.

LSFS-DD-HA

Again, the performance is almost doubled by using Round Robin - 359 vs 690 IOPS.

LSFS-DD-L1-L2-HA

That's the final test scenario where I wanted to see how Virtual SAN behaves with all bells and whistles enabled. As you can see I could get amazing result of 740 IOPS on my very humble test hardware with data being mirrored between two 7.2K HDDs only while keeping latency under 50ms.

I have also tested the HA enabled devices in Fixed mode just to see what kind of performance I get if I blindly follow best practices documentation. 

I merged both - RR and Fixed - results into one table just to see what gives me the best results in my particular configuration


As you can see in all configurations the Round Robin multipathing was outperforming Fixed PSP. So, I need StarWind need to review and update their Best Practices documentation that says Fixed PSP is the only supported configuration on ESXi hosts. 


I know there are more device combinations and more combinations of IOmeter specifications to try, but I have that much of time on these tests. If there is interest in more test combinations and on different hardware I might write another post on this.

Again, I would like to stress out that these test results are given here for the sake of comparison of features and disk types. The test system does not meet the minimal system requirements and therefore test results are valid only for this particaluar setup.